This blog has, IMO, some great resources. Unfortunately, some of those resources are becoming less relevant. I'm still blogging, learning tech and helping others...please find me at my new home on http://www.jameschambers.com/.
Showing posts with label CodeProject. Show all posts

Monday, February 28, 2011

Fixing “Unrecognized configuration section userSetting” Errors

Though I have not seen the error “Unrecognized configuration section userSetting” as a standalone exception, it has come up a number of times for me and surfaces as the inner exception on a “Configuration system failed to initialize” exception.

If you’re running into this error and following along, I’m currently using Visual Studio 2010, mostly on .NET 4.0 and I program in c#.  If you’re using a different environment some of the file names or UI might be a bit different, so you’ll have to adjust accordingly.

The exception will be raised in Settings.Designer.cs, on the first attempt to read a value from the application’s configuration.

You can fix the error by navigating to the current directory where the user settings are being saved for your app.  This will be in %system%\users\your_user\AppData\Local\Microsoft\YourApp.vshost.######\version

Delete the user.config file, clean your solution and rebuild all.  This should fix the problem.

If that doesn’t work, you may need to go so far as to shut down Visual Studio, clean out all the %system%\users\your_user\AppData\Local\Microsoft\YourApp directories of any config files and then follow the above steps.

What’s Happening?

When you first add a setting to the application through the UI, the default is to create a user-scoped setting.

image

User settings and Application settings are primarily different on two fronts:

  1. Storage location
  2. Run-time accessibility

User settings are read/write and can be altered at run-time. These are perfect to save things like favorites, window layout, user-specific options, color preferences and the like. These files are stored in a directory created for the application, basically sand-boxed from system-wide access and the only place your app can read/write from for free (elevated privileges aside).

Application settings are read only at run-time and can only be altered by changing the XML file and relaunching the application, or by some creative XML file management (and then a reload on your configuration data).  These files are stored in the app directory in app.config and also contain the default settings for users who have not yet launched the app (these are the settings that will be defaulted in for the new users).

I have hit the “Configuration system failed to initialize”Configuration system failed to initialize error a couple of times, and it always seems to be the User scope default biting me in the arse.

Basically, I create a setting, plug along for a while, then go back to add another setting and realize that I had left it in user scope.  I switch the first setting to application scope and keep plugging away.  Somewhere between then and the next time the application tries to access that property, the exception is thrown and doesn’t give you much detail at the surface level.

Figuring out the Files You Need to Delete

I said you can likely delete the user.config files without much regard.  Truth is if you’re into testing something settings-related that can be a real inconvenience.

I will drill into the inner exception to find the problem file; it’s only two deep, so it’s easy to find the path of the file in question if you’re willing to dig. 

Trust me, folks, your debugger is your best friend.

Monday, February 14, 2011

An Azure Deployment Primer

From the Developer & Evangelism Labs: Introduction to Windows Azure

This post is a summary of the notes I took while working through the Introduction to Windows Azure lab in the January 2011 Platform Training Kit.  I ran into a couple of road bumps and bruises along the way and thought I’d share.

The Platform Training Kit – The download for the kit

The sample is a guestbook that lets you write your name, a message and post a photo.  A background service resizes the photo and the thumbnail is linked to the full size image.

The lab walks you through setting up the relevant bits of the application locally, then walks you through deploying it the application to the cloud.  I found it to be a good balance of hand-holding and explanation, but you may find many questions left unanswered. The Microsoft Platform Evangelism team has certainly lowered the bar for folks to get in over their head! Thankfully there are 26 other labs to help quench your thirst.

When you get it up and running, here’s what the end product looks like:

image

Well…that’s what it looks like if you post a picture of the snow on my roof with a name of MisterJames! 

Snags, Detours and Road Bumps

Documentation Gap

Following the lab from the first step and trying to use the project through all of the exercises has its pitfalls. First of all if you make a mistake, that carries through the whole way.  Secondly, when preparing for and throughout exercise 3 (deployment) there isn’t much clarity around the implications of misnaming your hosted service or storage account.  There are also rules around naming (they have to be DNS suitable names) but this isn’t clear through the docs.  Worse, the error you get when you make an account naming mistake is not very leading: One of the request inputs is out of range.  I was getting this error when making a call to CreateTablesFromModel, and nothing really pointed me back to the name.

You can, however, opt to jump in with the files provided for the lab.  At each step of the exercise the team has provided us with an updated, accurate solution to continue from.

This is good, as in step 3 it assumes you’re using that and doesn’t give clear instructions on the updates required in the service configuration file.  The nodes and values required are in the provided solution.

Error Loop on Deployment

After I completed the lab I started playing around with config files and some simple changes to the app.  In that process I managed to botch a deployment package (the configuration bits).  Unfortunately, I didn’t realize that until I had already deployed the package as an upgrade to the first version.  The instances were stuck in some updating/starting/waiting/resetting cycle that took over 40 minutes to work itself out. The result was an error state, which until reaching I was unable to stop and update the service.

A Missing Warning

I just want to add another voice to the mix here: remember to stop and delete your project as you don’t want to be incurring charges or burning up valuable compute cycles.

Time Expectations

This is a lab that is scheduled to take approximately 60 minutes.  In addition to the coding bits I took two phone calls, answered a few IMs and emails and was wrapped up on the code/deployment side of things inside 55 minutes. I did muscle through it pretty quickly, though, as I’ve done several of these labs and know the style. 

If you aren’t patterned to recognizing the parts you should and shouldn’t need to read, this lab could take up to 75 minutes to complete.  One other note: I already had my Azure account up and running, so I was able to skip that part of the task.

After plugging through the juicy bits, I then had to wait for the succession of updates, host starts, role starts and what not.  This easily pushed me over the allotted 60 minutes.

image

For all of these services to finish their progression to their final states took about 20 minutes, at which point we end up here:

image

Conclusion

Set aside a two-hour slice of time and you should be able to move casually through the lab, start to finish. The Introduction to Windows Azure does a great job of touching on many of the concepts you’ll be working with when you get into cloud development.  You will be left with questions around deployment and configuration, but this start is good exposure and the walkthrough doesn’t leave out any important steps.

Don’t forget to delete the services created in the lab!

Friday, October 8, 2010

Unravelling the Data – Ill-Formatted Data


Read the background to this post.

When Bad Data Is Required

Fixing the data in the legacy system was not something that could be done in place.  What I would refer to as ‘bad’ data was in some cases the glue that held reports together and made things like billing work.

This was one of the first things I had to resolve.  My original approach was that I was going to try to “self-heal” the data through a combination of regular expressions, string replacements and templated hints and helpers.  With the sheer number of discrepancies, this approach was DOA, and manual intervention was required.

A Side Order of Data Fixin’

I took a snapshot of the database and added additional columns to the tables where combined data was present.  To understand ‘combined data’ a little background will help.

image At various points in the application lifecycle the management had decided that they weren’t going to use the fields for their original purpose and started using them for a new one.  In other scenarios, they decided to use the fields in one context for some customers and in a different context for other customers. 

Depending on the customer and how long it took employees to shake old habits, these fields were used in differing ways over extended periods of time.  Furthermore, even if there was a clear drawing point, none of the records in the database have a last modified date or any kind of audit log that reveals when a customer record is modified (in a meaningful way).

Thus, my side order approach faced another problem: there was no clear cut of the data and the existing applications needed to keep running.  A snapshot of data today wouldn’t help in the transition 6 months down the road.

The Birth of the Transition Platform

The solution was to create an ASP.NET MVC application, hosted only on the intranet, that used much of my original approaches to identifying bad data, but left the “healing” to an end user.

Where possible, I used jQuery to look up context-based fixes through controller actions and mashed-up some save functionality by POSTing to the legacy ASP pages of the original application.  Where it wasn’t possible (where functionality would be affected by changes to data) I created proxy tables to house the ‘corrected’ version of the data and wrote some monitors to periodically check to make sure that data was up-to-date.

I grouped functionality of the fixes into distinct controllers.  For instance, anything related to a billing address was in the BillingAddressController with actions to support the corrections required for errors related to that piece. The models focused on model-view versions of the “bad data” and I used repositories to not only connect to the legacy system, but also to maintain a worklog of outstanding and completed tasks.

This worked great, as I was also able to say, at any given point, where we were at percentage-wise for correcting any set of data.

This process continues on today, and time is devoted to cleaning data each week.  All three of the legacy systems continue to get (mis)used, though accuracy has been greatly improved.  As users became aware of expected formats they also became more conscience of how they were entering the data into the older software.

This first win made the next steps more plausible.

Next up: Data that Could be Auto-Corrected

Wednesday, October 6, 2010

Unravelling the Data – Understanding the Starting Point

So, we’re now into October and the year is passing quickly.  The major function of my employment – helping the organization flip to a new operations platform – is nearing completion.  As well, I have just wrapped up an 11 week series of articles with a publisher that I am very excited to share (but have to wait a little still!).  The articles explain my rarity here on my blog, but I am glad to have some time to invest in this again…especially with the release of the MVC 3 framework!

What I Actually Do

image My current work – at it’s core – is a data conversion project, but don’t let the simplicity of that synopsis fool you. 

The reality is, when it comes to inventory, billing, service and customer management, that when you flip the company’s software the data conversion is the easy part. 

Often, it’s the process changes that can cripple the adoption of a new platform, especially when you’re moving from custom developed software and moving to an off-the-shelf product.  Change can be very hard for some users.

I have the good (ha!) fortune here of working through both data and process transformations.

The Transition Platform

Being the only developer on the project – and in the organization – I do have the pleasure of being able to pick whatever tools I want to work and the backing of a company that pays for those tools for me.

imageIf you’ve ever hit my blog you know that I am a huge fan of the .NET Framework and the ecosystem that you get to be a part of when you develop software within it.  The tools have come so far in the last decade that you would not even believe that the same company made them.

Great progress has been made – albeit at times slower than other vendors in certain areas.  But with Visual Studio 2010 (which I switched to halfway through the project) and the MVC Framework I was literally laughing at how trivial some of the tasks were rendered.

The vertical nature of a development environment and a deployment environment that are designed to work together make things even that much more straightforward.

It is important to note that my development over the last year was not the end to the means.  What I produced was simply a staging platform that would facilitate a nearly-live transition to the target billing and customer management system.  My job, done right, would leave no end-user software in use.

Onto The Problem with the Data

Not all data is a nightmare.  A well-normalized database with referential integrity, proper field-level validation and the like will go a long way to helping you establish a plan of action when trying to make the conversion happen.  Distinct stored procedures coupled with single-purpose, highly-reusable code make for easily comprehended intention.

Sadly, I was not working with any of these.  The reality is that I was faced with the following problems opportunities that I had to develop for:

  • There are over 650,000 records in 400 tables. This is not a problem in and of itself, and it’s not even a large amount of data compared to projects I’ve worked on with 10’s of millions of rows.  It likely wouldn’t be a problem for anyone, unless they had to go through it line by line…
  • I had to go through it line by line.  Sort of.  There were several key problems with the data that required careful analysis to get through like dual-purpose fields, fields that were re-purposed after 4 years of use, null values where keys are expected, orphaned records. 
  • The data conversion couldn’t happen – or begin to happen – until some of the critical issues were resolved.  This meant developing solutions that could identify potentially bad data and providing a way for a user to resolve it.  It also meant waiting for human resources that had the time to do so.
  • The legacy software drove the business processes, then the software was shaped around the business processes that were derived from the software.  This feedback loop lead to non-standard practices and processes that don’t match up with software in the industry (but have otherwise served the company well).
  • Key constraints weren’t enforced, and there were no indexes.  Key names were not consistent.  There were no relationships defined.  Some “relationships” were inferred by breaking apart data and building “keys” on the fly by combining text from different parts of different records (inventory was tied to a customer only by combining data from the customer, the installation work order and properties of the installer, for example).
  • The application was developed in classic ASP and the logic for dealing with the data was stored across hundreds of individual files.  Understanding a seemingly simple procedure was undoubtedly wrapped up in hundreds of lines of script, sometimes in as many as a dozen different files.

Mashing Up Data

The items listed above were all significant challenges in-and-of themselves, but  the reality is that these are just a sample of the problems opportunities, from just one system.  I had three to work with, and all were joined by a single, imageASP script-generated key.  If you just threw up in your mouth a little bit, I forgive you.  I did the same when I saw that, too.

Worse, the key was stored as editable text in all three systems.  Because of a lack of role- and row-level security, someone working their second day at the company could change the key, switch keys between users.  It was a little scary.

And I can’t imagine a manager in the world who likes to hear, “Hey, I’m going to just take three unrelated sets of data, mash them up and let you run your business on it, mmmkay?”  Obviously a better approach was needed.

Now, Here’s How I Got Through

It took over a year, but I am now close enough to the finish line that I could throw a chicken over it.  In post-mortem fashion, I’ll talk about each of the challenges I had to work through, and how I tackled them over the next few posts.

Stay tuned for: Ill-Formatted Data

Wednesday, September 1, 2010

Getting Started in Azure - The PhluffyFotos Sample Application

I initially wanted to create a post that would get someone up-and-running with Windows Azure, start to finish, but the reality is that there is no “simple” app you can create. While you can create a simple data service, or a simple MVC web site, or even walk through the implementation of a simple worker role, there are many parts to an Azure application, each warranting their own series of posts.

However, I found an out: the Azure samples and training site.  I have been around long enough to develop within most of the paradigms required for Azure development, so, with my head as big as it is, I didn’t want to go through a walkthrough that was dozens of pages long.  There is something that is instantly gratifying about having a working app in front of you that you can poke and prod and change and learn to understand.

What this post is not

This is not a comprehensive walkthrough or a hand-holding exercise to get you up-to-speed in Azure development. You will not be a professional Azure developer ready for your first cloud app assignment.

I am not sharing the code as text in this post.  If you’re going to follow along, you’re going to have to have the sample downloaded (the link is inline in the post).  My assumption is that you’re able to navigate your way through a solution and find the code files I’m discussing.

What this post actually is

The first part of this post should take you less than 30 minutes and you will have PhluffyFotos running locally.  The application makes use of Azure data services, workers, and the ASP.NET MVC 2 framework.  It’s billed as fairly 2.0-ish, and has a functional Silverlight 2.0 slideshow viewer to boot.

image

The second part of the post breaks down some of the UX elements and explores some of the tech that powers said UX.

I have a fairly clean install of Window 7 with Visual Studio 2010 running on it, so there should be no surprises if you’re running with a similar setup.  As I progressed through the procedure I have taken notes so that you should be able to replicate my steps.  If you find that I have missed anything, please let me know!

Enable Azure tools through the Visual Studio 2010 Project Templates

Create a new project and select the category of “cloud”.  Walkthrough the download, exit VS and install the tools.  You can obviously omit this step if you’ve already setup Azure tools on your machine.

Download the sample app

This is located here on CodePlex.  Unzip it to it’s default location.

Enable PowerShell Scripts for Scripts Signed by a Trusted Source

To do this, run PowerShell in administrator mode and use the following command:

Set-ExecutionPolicy RemoteSigned

Build PhluffyFotos

Open Visual Studio 2010 in administrator mode, then navigate to and open up the solution in the code directory.  It’s located in the root of the folder you unzipped in the second step.

Do a CTRL+SHIFT+B on the solution to build out the bits.

Close down VS2010.

Provision Local Queues and Storage

This is required so that you do not have to sign up for an Azure account.  At this time, only residents in the USA have the opportunity to create one (even for test purposes) without a credit card.

Open up a command prompt in administrator mode and navigate to your setup/scripts directory in the project folder.  Type the following command and hit ENTER:

provision.cmd

You don’t technically have to run this from a command line, but if you just execute the script without a command line you’ll miss any feedback/error messages should any surface.

Run the App!

Finally, open Visual Studio 2010 with administrative privileges. Open the PhluffyFotos solution and press F5. 

Create yourself an account and start uploading some images.  You can try to navigate around the site, add additional albums and use the slide show.

image

This concludes the first part of this post, and you should be running the app without much fuss.

First Thoughts – Interface and Basics

There’s a lot to set up here, but keep in mind that we’re actually jumping into a project that essentially complete.  You’re required to do all of the things a project would require as you develop it, but you have to do it all at once to get it setup.

The sample application isn’t robust enough to be production quality, but as a sample, that is to be expected.

After uploading a new foto…erm…photo, the image does not seem to appear:

image

However, after navigating back to the same page through the album/photo selection process (or waiting several seconds and pressing refresh), the photo appears:

image

After deeper review, this seems to be as a result of the worker process not finishing the thumbnail generation prior to the site returning the view which requires the image.  I don’t know if this has to do with local performance of the fabric at this point or other variables (such as the 2-second queue sleep in the config).

Another glitch (in my mind) would be that albums without photos are not represented in the interface until you have a picture.  While this makes sense for people who don’t own the albums (you, visiting my profile), for the person who just created the album, it’s a little confusing.

For example, if I create an album called “My Cherished Family Photos”, then navigate to my list of albums, the newly created album is not there.  If you then try to create a new one with the same name (assuming that the “add” didn’t take), the application just throws an exception.

Finally, and without an extremely deep dive, once you’ve selected an album to view, the MasterPage link to Home is broken, only ever returning you to the album cover and not your full list of albums.  Either the link text should be changed, or the link, or both.

Interesting Technical Bits

I was a little worried when I first opened the app as there were several projects in the solution. As a first-stop for Azure exploration, this might be a little intimidating.

image

Let’s have a quick look at the breakdown here, but a little out of order:

  • PhluffyFotos.WebUX
    • Used to render the interface, this is an ASP.NET MVC 2.0 project.  There are some very simple view models, the appropriate controllers and expected views and references to all the other projects, save Worker.
    • There is a third-party component here as well, Vertigo.SlideShow, which is a Silverlight control used to display a slide show of the photos.  It accepts an XML string of photo URLs and renders the images from the selected album on the site.
  • AspProviders
    • These are the ASP.NET role, membership, profile and session state providers that will be used with the application.  This goes back to the beauty of ASP.NET 2.0 – we are still able to use the good bits in ASP.NET like authentication and authorization, but we can sub out our providers to use the back-ends that we like.  In this case, it’s built on the Azure StorageClient and linked to the MVC site in the project with entries in Web.Config.
  • PhluffyFotos.Data & PhluffyFotos.Data.WindowsAzure
    • Data is where the models for the site – Album, Photo and Tag – are defined.  We also have the definition of the IPhotoRepository interface which sets up the contract for creating and manipulating the above models, as well as searching for photos based on tags.  A few other helper methods support some lower-level procedures such as initializing the user’s storage and building the list of photos for the slideshow.
    • Data.WindowsAzure takes the models and Azurifies them, primarily by adding simple wrapper classes that inherit from TableServiceEntity and store the model objects as Azure-compatible rows.  This project also contains the PhotoAlbumDataContext as well as conversion classes for moving the Azure version of the entities back to project models.
  • PhluffyFotos.Worker
    • The WorkerRole class in this project is the implementation of the abstract base RoleEntryPoint class for the Azure worker.  There are OnStart, OnStop and Run methods common to all services.  When run, it will execute one of three predefined commands: CreateThumbnail, CleanupPhoto or CleanupAlbum.  This worker is executed until processing in all queues is completed.
  • PhluffyFotos
    • This is the project that defines the roles that are used in this Azure application: WebUX and Worker.
    • The configuration defines the HTTP endpoints, the maximum number of instances of a role, and any custom settings that may be required for the roles.
    • This is also the default start-up project for the solution.  The magic of Visual Studio uses this project to ensure that the local development fabric is running then deploys the service and launches our web site (the default HTTP endpoint on port 80).  Pretty slick.

The Azure Bits

After you get a good lay of the land, there’s not really too much going on to make it tick.  As I implied, I thought it could be a little intimidating to get an Azure solution running if you needed five projects to make it tick.  With a better understanding, that’s not really the case.

For all intents and purposes, the web UX site behaves as you would expect any MVC 2.0 site to behave. You have an album controller with an Upload view.  When submitted, the photo is pulled from the forms collection and passed to the repository.

image

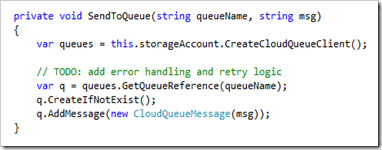
The Azure part comes in at this point: the photo’s on the way to the storage cloud after adding a new object to the data context.  There are two parts to this, the table entry and the blob storage.  This is great, as we can now explore this and know how to send binary objects to Azure storage. 

Next, the image properties are sent to the queue for further processing by this private method in the repository: 
image

That worker role we saw earlier will now have some work to do with an image waiting to be processed.  This queue behavior is similar to other bits in the project when albums or photos are deleted.

Next Steps

The one thing I would like to spend more time exploring is the provisioning of tables and queues in the cloud.  The PowerShell script for queues is quite straightforward (a single call for each queue) and the table provisioning is only slightly more complex (a call is made to a method in the PhotoAlbumDataContext) but all this is done without explanation in this project. 

Data and queue provisioning is part of the setup you perform to get running, but it’s also critical to the project working.  PowerShell is fine locally, but how do you reproduce this creation in the cloud?

I also want to understand better some of the architectural decisions on this particular project…like, why is deleting a photo an operation that needs to be queued?  Are blob storage operations inherently slow enough to justify this?  Was it simply for demonstration purposes?

Wrapping Up

Creating this post was a great way to contextualize the basic components of an Azure application.  Sure, I’ve created sites, services, models and setup endpoint bindings before, but not in the context of Azure.

I could have joined any team and crafted an MVC site that sits on top of a repository such as the one in the project, and I would never have to know skip-lick-a-beat about Azure – it is that seamlessly integrated into the solution – but I much prefer to get my hands dirty and learn about what’s going on behind the scenes.

I hope this post helps you navigate through the PhluffyFotos sample application and gives you a grounding in Azure-based cloud development.

Tuesday, May 4, 2010

ASP.NET MVC and jQuery Part 4 – Advanced Model Binding

This is the fourth post in a series about jQuery and ASP.NET MVC 2 in Visual Studio 2010.

image In my last post I covered the simple scenario of a Person object getting POSTed to an MVC controller using jQuery.  In this article, I’m going to look at three other, more complex examples of real-world model binding and where jQuery might fit in the mix.

The model binding scenarios I’ll cover are:

  • Sorting a list with jQuery UI support and submitting IDs to the controller for processing.
  • Using jQuery to augment the user experience on a list of checkboxes (supporting check all/none) and allowing MVC to handle the elegance on it’s own.
  • Give users the ability to build a list of items on a complex object, then submit that object to an MVC controller for processing.

The entire working solution is available for download at the end of the file.

Preface

In the first two examples here I have lists of data that are statically programmed into the page.  From my earlier posts in the series you can see how easy it is to generate partial views that would drive the UI elements from a database or other backend.  For brevity, I’m leaving those elements out of this example.

Sortable Lists

imageThe jQuery UI library provides the sortable() function which transforms the children of a selected element in the DOM to draggable, orderable items for the user to manipulate.

The sortable() extension also provides a mechanism for us to capture the order of the list via the toArray method.

Using the jQuery.ajax() method, we submit the results of the users’ efforts via post to a controller action.  For the purpose of this post, I’m not going to do any processing in the controller, but you can set breakpoints to see the data getting hydrated into the models.

Let’s start by setting up the controller action, which accepts a list of ints as a parameter to capture the order of the IDs.

image

Yes. It’s that simple.  Now, you’d likely want to do some processing, perhaps even save the order to a database, but this is all we need to catch the data jQuery.ajax() will throw at us.

The juicy bits in jQuery are as follows:

image

Note: In order to make the results of the array compatible with the binding mechanism in ASP.NET MVC (as at MVC 2.0) we need to use the ‘traditional’ setting in $.ajax().

There are a couple of interesting things to note here:

  • jQuery.ajax() by default makes requests to the current URL via get.  My controller action that accepts the List<int> is the same name as the basic view.  I change the type here to POST and the proper controller action is called.
  • The ‘toArray’ returns an array of the selected element IDs.
  • My unordered list contains list items with IDs that represent the unique items.  In this case, they are integers stored as strings (by nature of HTML).
  • The name of the list of IDs is passed in as the same name as the parameter in the controller action.
  • When submitted to the controller, the MVC framework finds the appropriate method, looks at the expected parameter type and sees the array sent by the client.  It then uses reflection and parsing (and maybe some voodoo) to coerce the values into the expected parameter type.

image

We can then use the list of IDs as required in the comfort of c#.

One of the interesting things that you can do, as the List<int> parameter is an IEnumerable, is that you can use LINQ to Objects on these guys without any effort.  Thanks MVC Framework!

Submitting Checkboxes

image How do you submit a list of the selected checkboxes back to an ASP.NET MVC controller action?  It’s all too simple.  In fact, the only reason I mention it here is to highlight some of the simplicity we inherit when we use the MVC Framework.

I actually laughed out loud when I figured this one out.  It’s that good (or, I’m that easily impressed).

For jQuery on this example, I’m only really going to use it to augment the user experience by providing a couple of buttons to check all or check none of the options.

We’ll use a standard HTML form and allow the user to select the items in a list they feel are appropriate.  The form will be submitted via POST to our controller action (named the same as the ActionResult for the original View) and our parameter will be automatically populated for us.

image

Some things to point out at this junction:

  • The values on the checkboxes here are the same strings that are displayed in the labels.
  • I have given all the checkboxes the same name. When submitted, MVC sees these as some kind of enumerable thing and will then try to bind based on that.
  • Optimus Prime is not a Jedi.
  • This the name used for the checkboxes is the same name as the parameter in the controller action.

Packing a Complex Model

image What about if you have a complex type with properties that can’t be expressed with simple HTML form fields? What if there are enumerable types as properties on the object? 

Man, am I glad you asked! The ASP.NET MVC Framework is pretty smart about taking items off the client Request and building up your objects for you in the hydration process.

Here is my Suitcase class, with a List<string> that will contain all of the things that someone wants to take along on their vacation.

image

So how do we get those items into the object?  The first step is to allow users to create them.  We do this with a simple textbox and a button, rigged up to some jQuery script as follows:

imageWhen the user enters an item and clicks ‘Add to suitcase’ (or hits enter) we grab a reference to the textbox.  Next, we use jQuery.append() to create a new LI element with the contents of the textbox.  Finally, we clear out the value and return focus to the input field.

When the user is finished loaded up their bags, we need to create a data map that will be submitted.  To simplify the process a little, we’ll first get that list of clothes together.

image

We first create an empty array.  Next we use jQuery.each() to loop through all the returned elements – the list of LI elements that the user has created – and add the text of those LIs to the array.

Next, we POST the data back to the server:

image

Here are some observations:

  • We’re POSTing and using the traditional setting so that the enumerated items are compatible with the current versions of jQuery and MVC.
  • The names of the properties in the Suitcase class are the names of the values we use in the data map submitted by jQuery.ajax().
  • As in the first example, jQuery.ajax() is posting to the default URL, which is the same URL as the view in this case.  In the controller we differentiate the action with the HttpPost attribute and, of course, the Suitcase parameter.

When the data is submitted we see this in the controller action breakpoint:

image

And the contents of the Suitcase.Clothes property:

image

Wrapping Up

There you have it: the basics of advanced…stuff. 

From here you should be able to work out most scenarios when building up objects in jQuery, submitting them to the controller and making a jazzier UI come together with jQuery UI while still using MVC in the backend.

Some things I’ve learned along the way:

  • Remember to watch the names of your variables in data maps! They have to match the parameters (or member properties) of the controller action.
  • If you’re having trouble getting things to submit and you’re not seeing any errors, try attaching FireBug in FireFox to the browsing session and see what’s happening to your requests/responses.
  • Make sure that you’re sending the values of the jQuery selections, and not the objects themselves if you’re having trouble binding.
    • Don’t send: $(“#my-textbox”)
    • Send: $(“#my-textbox”).val()

Resources

Friday, April 23, 2010

ASP.NET MVC and jQuery Part 3 – Model Binding

This is the third post in a series about jQuery and ASP.NET MVC 2 in Visual Studio 2010.

100% of the developers I have talked to this morning are enjoying jQuery and how it makes ASP.NET MVC sites a treat to work on. Of course, the sample size was one (1) developer, and he’s writing this post. Just sayin’.

In this article I’m going to cover some of the model binding scenarios that work seamlessly with these two technologies, starting off with some background and a sample, then progressing to more complex concepts.

Model Binding Basics

Model binding occurs in the processing of a request in the MVC framework, after routing and the creation of the controller. After the controller comes out of the factory, reflection kicks in to match up the request from the routing engine (as a result of some client action) with any parameters in the HTTP request.

Said another way: form values and querystring parameters get automatically turned into .NET objects in the MVC framework. Cool.

To provide a simple overview of how model binding works, we’re going to set up a quick demonstration. Start up the IDE and create an ASP.NET MVC 2 Web Application. Delete the Index file (we’re going to create our own later). Here’s the steps we’re going to follow:

  • Create a new model called Person (and build our project)
  • Update our Controller to setup an “empty” person for our view
  • Create a strongly-typed view to create a person
  • Create an action method on our Home Controller to capture the ‘create’
  • Let the MVC framework do the rest

We’re not actually going to persist anything here, this is just a show-and-tell.

The simple parts

Navigate to your Models folder and right-click to Add –> Class called Person. Complete the class out as follows:

image

We need to build our project here (SHIFT + CTRL + b) for the IDE to be able to see our class in later steps. The type-awareness from reflection requires that our type exist in an assembly.

Pop over to Controllers –> HomeController and delete the ViewData assignment. We’re going to create a new Person here and return it with the view. Our action looks very simply like so:

image

image Right-click anywhere in the method and select Add View… from the context menu. We are adding a view named Index, setting it to be a strongly-typed view and setting the view content to Create. This will allow code generation to output the basics of the form we’re going to use.

Note that here, or anytime you try to add a view, that if your model hasn’t been updated by building your project your types won’t appear in the View Data Class drop-down. You can cancel, build, and re-open the dialog if that is the case.

The page that is generated is super handy as a starting point. Even if it doesn’t save me much time (after all the changes and deleting I do) for some reason it just makes me feel better that the computer had to do some work too.

Let’s clean it up a bit. Remove the validation controls, delete the DIV with the ‘back to list’ link in it and change the H2 to something more interesting.

Because I’m not going to be posting back to my Index action method, I need to also update the using statement to have to correct calls created for submitting the form:

Html.BeginForm("CreatePerson", "Home")

Finally, let’s add a bit of code with the corresponding method, CreatePerson, and a breakpoint in our Home controller:

image

The above doesn’t actually do anything (and won’t go anywhere past the breakpoint), but if you pause where I suggest and evaluate the Person object or the name that was assigned the string, you’ll see the values populated.

How did the Model Binding Work?

There are actually a ton of in-depth explanations out there, but here is the summary of what we’ve done and what the MVC framework does to support model binding:

  • We have a class with public properties
  • The template engine created a page for us with the HTML helper TextBoxFor
  • TextBoxFor uses the name of the public properties to generate a form input with the same name
  • The template creates a form to host those controls, which we directed to our controller and action
  • When written to the browser, the form action is set to “/Home/CreatePerson” using the POST verb
  • The MVC framework routes the form submission to the Home controller, then uses reflection to find the CreatePerson method
  • Because the method accepts a Person object as a parameter, the MVC framework evaluates the HTTP request (querystring parameters, form values) and then hydrates an object for us

Now, Let’s Make it Interesting

So far, this has just been a demonstration of simple model binding in the MVC framework. Let’s get jQuery involved.

  • Change the controller action to a partial view result
  • Create a partial view that reveals the created person
  • Add jQuery and jQuery UI to the Site.Master file
  • Remove the using statement from the Index page
  • Modify the input so it’s easier to select in jQuery
  • Add a DIV to store the results of the create
  • Add a calendar selector for the birthdate
  • Submit the form via jQuery when the user clicks the button
  • Clear the form when the partial view result comes back, and display the result

Let’s start by changing the method to only accept POSTs and simply returning the Person object we were passed in to the PartialView.

image

image Right-click anywhere on the method and select Add View… from the context menu.

This time we’ll create the view as a partial, it will be strongly-typed to Person again, but we’ll set the View Content to Details.

The tooling support for the MVC Framework in Visual Studio 2010 will then create the ASCX (server control) for us with all the fields displayed.

Delete the P tag at the end of the generated control with the ActionLinks in it, leaving only the control tag at the top and the FIELDSET control.

Next, pop into Views –> Shared –> Site.Master and add jQuery to the HEAD of the master page. Let’s also add jQuery UI at this time to open the doors to some other augmentations. For full functionality you’ll need the CSS and the images folder in your project as well, and the CSS linked in the HEAD of the master page.

In Index.aspx, remove the using statement so that the form is no longer generated. This is easy if you use Visual Studio 2010’s collapsible regions (you can collapse the FIELDSET tag to see the whole using construct).

Add an ID with a value of “create-person-button” to the submit button at the bottom of Index.aspx. Lastly, before we get scripting, add a DIV to display the partial view when the person is ‘created’. These last two bits should look like the following:

image

On to the script

jQuery gives us a way to easily make AJAX requests via POSTing to the server. We pass in a map of data that the server is expecting. The result can be passed to a function that evaluates the results.

With the inputs setup the way they are and our placeholder…uh…holding a place, we’re all set to execute our POST.

We’ll write a helper function that will process the results of the POST operation and, of course, a jQuery ‘document ready’ event handler to setup the calendar and trap the submit button click.

image

Most of the code should be easy enough to follow along. The one interesting bit is that the data map need not be constructed with proper case. That is, if your fieldname is FirstName you can use FiRsTnAmE as the name in the data map and that is okay.

Run the app and enjoy!

The jQuery UI datepicker in action:

image

The form cleared after submit and the results of the POST displayed:

image

Some Caveats

At this point we don’t have any validation in place, we’re not saving to a database of any kind and we’re hooped if there’s a server-side error.

Unfortunately the jQuery POST doesn’t play nicely with unhandled exceptions that are thrown on the server. $.post is shorthand for a sub-set of the functionality (with some presets) of $.ajax, and only maps a handler for the success event (not error events).

To see this in, well, inaction change your CreatePerson action to the following:

image

This will instruct the MVC framework to pass the person object through to a view named “foo”, which doesn’t exist. If you run the form at this point, and submit, you’ll see no errors (unless you attach a debugger, like FireBug, to the script).

More to Come

In my next article I’m going to look at more complex data scenarios, like selections from a list and posting arrays back to the controller. I’ll also integrate some other goodies, like jQuery UI’s autocomplete, to help users pick a color.

Resources

Thursday, April 15, 2010

ASP.NET MVC and jQuery Part 2 – Suggesting Content

This is the second post in a series about jQuery and ASP.NET MVC 2 in Visual Studio 2010.

Two perpetually frustrating tasks I have dealt with are scratching out a UI to collect data and having to work with that data client-side. Thankfully, a marriage of jQuery and ASP.NET MVC make this much more appealing and helps us to achieve, very quickly, a usable interface.

Suggesting Content from User Text

If you’ve used forums or user communities such as MSDN or StackOverflow where you can pose questions to peers, you’ve likely noticed that as you type your question related content begins to appear.

image

Here, we’ll replicate that behaviour and show how easy it is to make it work using jQuery and ASP.NET MVC. Because I will use some contrived data to make this work I will also include a solution download at the end of the article.

The Basic Steps

If you have a good grasp on things and just want to give it a try, here’s what you need to do:

  • Create an ASP.NET MVC 2 Web Application
  • Add jQuery to your Site.Master page
  • Establish your model for the results of the search
  • Create a repository to return a set of results
  • Create a controller action to return the list of results in a partial view
  • Create the required partial view
  • Create the entry form that lets users ask questions
  • Write script to take the form input and send it to the appropriate controller action, updating a DOM element with the results of the call

The Walkthrough

Setting up a project and getting jQuery was highlighted in the first article in this series. Create the project and get it set up for jQuery before you get going.

Creating a Model

Under normal circumstances you’d be working from a database that stores the related content you wish to display. Your model

Right-click on the Models folder in the Solution Explorer and click Add –> Class. Name the class Question and click Add. We’re going to add some properties to the class. This is really easy with auto-implemented properties in c# and the prop snippet. Type prop inside the class and you’ll see the following:

image

Hit tab and Visual Studio will generate the code you need and give you some assistance in filling in the key bits. You’ll notice the hightlighted text. You can use tab to cycle through the highlighted sections, which will select the text for you, and you can just over-type your values. Press enter to exit the snippet.

Add the following properties to the class:

  • int UpVotes
  • string Title
  • string Tags

Building the Repository

Right-click on the Models folder and add another class called QuestionRepository. We are going to fake a database here and create a property called Questions. Make the property private and of type IEnumerable<Question>.

image

When the class is created we want Questions to be filled with some data to emulate something like a DataContext you would see if you were using LINQ to SQL. Create a constructor and populate a List<Question> with several questions. This is easy if you use the parameterless constructors of c#. I even just write a blank one, then copy-and-paste it out:

image

Fill in the blanks! For my sample (and in the download) I have added about 10 questions and assigned the list of questions to the class’ private Questions property. I also assigned the UpVotes to a random number between 0-20 so that I could sort off of it and get different results.

Next, add an internal function called FindMatchedQuestions with the following signature:

image

The algorithm for deducing the related questions is not the subject of this article. Though I’ve included some basic logic to make it work in the download, here’s all you need to get going for now:

image

With that inside our ‘find’ function, we’ll always get some random results. Use the downloadable project for search-relevant results.

At this point, let’s build our project (Shift + CTRL + b) to get our models compiled and help out our tooling. If you do not compile, some steps will not be as smooth as I suggest; MVC tooling uses reflection to find types in namespaces, types that don’t exist without an initial compilation

To the Controller

Navigate to Controllers –> HomeController.cs and open it up. Add a new public PartialViewResult to the class called FindRelated that accepts a string parameter. Add the following code to the method, which calls the repository to get some data (the model) and returns a PartialViewResult with said model.

image

Visual Studio 2010 contains some great helpers for the MVCers of the world. While the library is heavily tested, (mostly) strongly-typed, robust and extensive, it also allows us to rely on convention to afford us great convenience in code and in tool support.

The first convenience I used here is part of the framework; by passing my model into the PartialView() that I’m returning, the framework looks for a View that matches the name of my action (FindRelated) and passes the model to it. The executed result is what is returned to the browser (after the framework is done with it).

The second convenience I’m demonstrating comes from the tooling support and the IDE’s awareness of the MVC conventions. On to our View…

Building the Partial View

I’m not going for style points, here, so I’m going to use what we get for free. Let’s use that convention-aware tooling and create our partial view by right-clicking on the Home folder in Views, then selecting Add view…

You’ll see the following:

image

This is okay, but there’s an even better way to do this. Cancel the wizard and go back to your HomeController source file. Right-click anywhere inside the the FindRelated function and click Add View…

Now, you’ll see the already-named, convention-following parameters for creating your view. We’re going to set the wizard to create a partial view that is strongly-typed with the Question class. We’ll also set the View content to List.

image

The template outputs a table for us, which is acceptable, but it won’t look great for our purposes. For now, let’s just clean up a little bit by:

  • Removing the first row which contains the headers
  • Removing the first column in the foreach with the ActionLinks
  • Removing the column that contains the output for item.Tags
  • Removing the P tag at the end of the View with the Create link

If you kill the whitespace in the document you are left with a very short Partial View:

image

To finish off the view, add an H3 tag for a title and set the contents to Related Questions.

A Quick Test

At this point, we’re basically ready to rig up our functionality. If you want to see the results of your work so far, we can just make a request to the controller’s PartialViewResult action and see the list of related content. Press F5 to run the project, then enter the following in your browser (remember to replace your port number!):

http://localhost:PORT/Home/FindRelated?searchText=foo

Looking at the URL we can observe the following interesting things:

  • Home is the name of our controller
  • FindRelated in the name of our action
  • searchText is the name of the parameter in our action
  • The view that is rendered sits in a folder called Home which is the first place the framework looks when resolving views for a controller called HomeController

Through convention and the routing support in MVC 2 and ASP.NET we are able to see our results. If you examine the HTML source you’ll notice there are no HTML, HEAD or BODY tags; they aren’t rendered from partial views.

Here’s the results of my test view:

image

Again, not pretty, but it will do!

Involving the User and Adding Script

The default template for an MVC 2 project includes Index.aspx. Open it to edit from the Views –> Home folder in Solution Explorer.

Delete the H2 tag and the P tag that were so kindly added to the home page for you.

Add two DIVs. One will host the user input control and the other will be the container for our results, so we’ll ID them appropriately. Specifying an ID allows us to work directly with the controls with a simple jQuery selector.

image

Expand the user search container to include brief instructions and a text input.

image

Finally, add your SCRIPT tag so we can insert some JavaScript. First, lets add our function that can update the contents of our results placeholder:

image

Next, let’s add a jQuery handler that is executed when the document is fully loaded. In here, we’ll bind the ‘blur’ event of the text input to a the SubmitQuery function we just wrote:

image

That should be it! Now, just like when you tab out of the question asking box on StackOverflow, your query will be submitted and a list of related questions can come back! Run the app with F5 to see the results. Enter some text and tab out of the text box to see the list load.

image

Wrapping Up

Obviously this is not a complete feature-for-feature exhibit of a related-question section on a site, but it’s a good start. In the download I have improved the search results (somewhat) and styled the results to look a little more like SO’s.

image

You can also extend your model to include an ID, or use a model from a database. With an ID, you could then create a controller action that loads a question, given an ID, and outputs a view that is strongly-typed to render a complete question.

Good luck!

Resources